Creating a virtual machine for acron jobs
Published onThis post has been archived. It's pretty old and likely concerns topics that are avoidable by using more modern tools and techniques. The original text is preserved below for posterity but it may no longer be relevant or correct.
Running periodic jobs with Kerberos authentication on CERN machines is easy with acron. We showed how to use acron in a previous post, and now we’re going to set up a virtual machine in the CERN network that can accept such acron jobs.
Having our own virtual machine (VM) is like having our own private server. We’re able to install whatever software we like on it, and the resources allocated to the VM are available only to us. This is in comparison with something like lxplus, CERN’s computing cluster that most users use for interactive work, on which the choice of software is fixed, and the speed of a machine is subject to what the other users using it are doing.
Combined with acron, we can create a machine that can run almost any piece of software we like, whenever we like, without us having to log in and execute it manually.
We’ll start by creating the VM, and then we’ll install the software that’s needed to run the acron jobs. We’ll finish by showing that everything works.
Creating the virtual machine
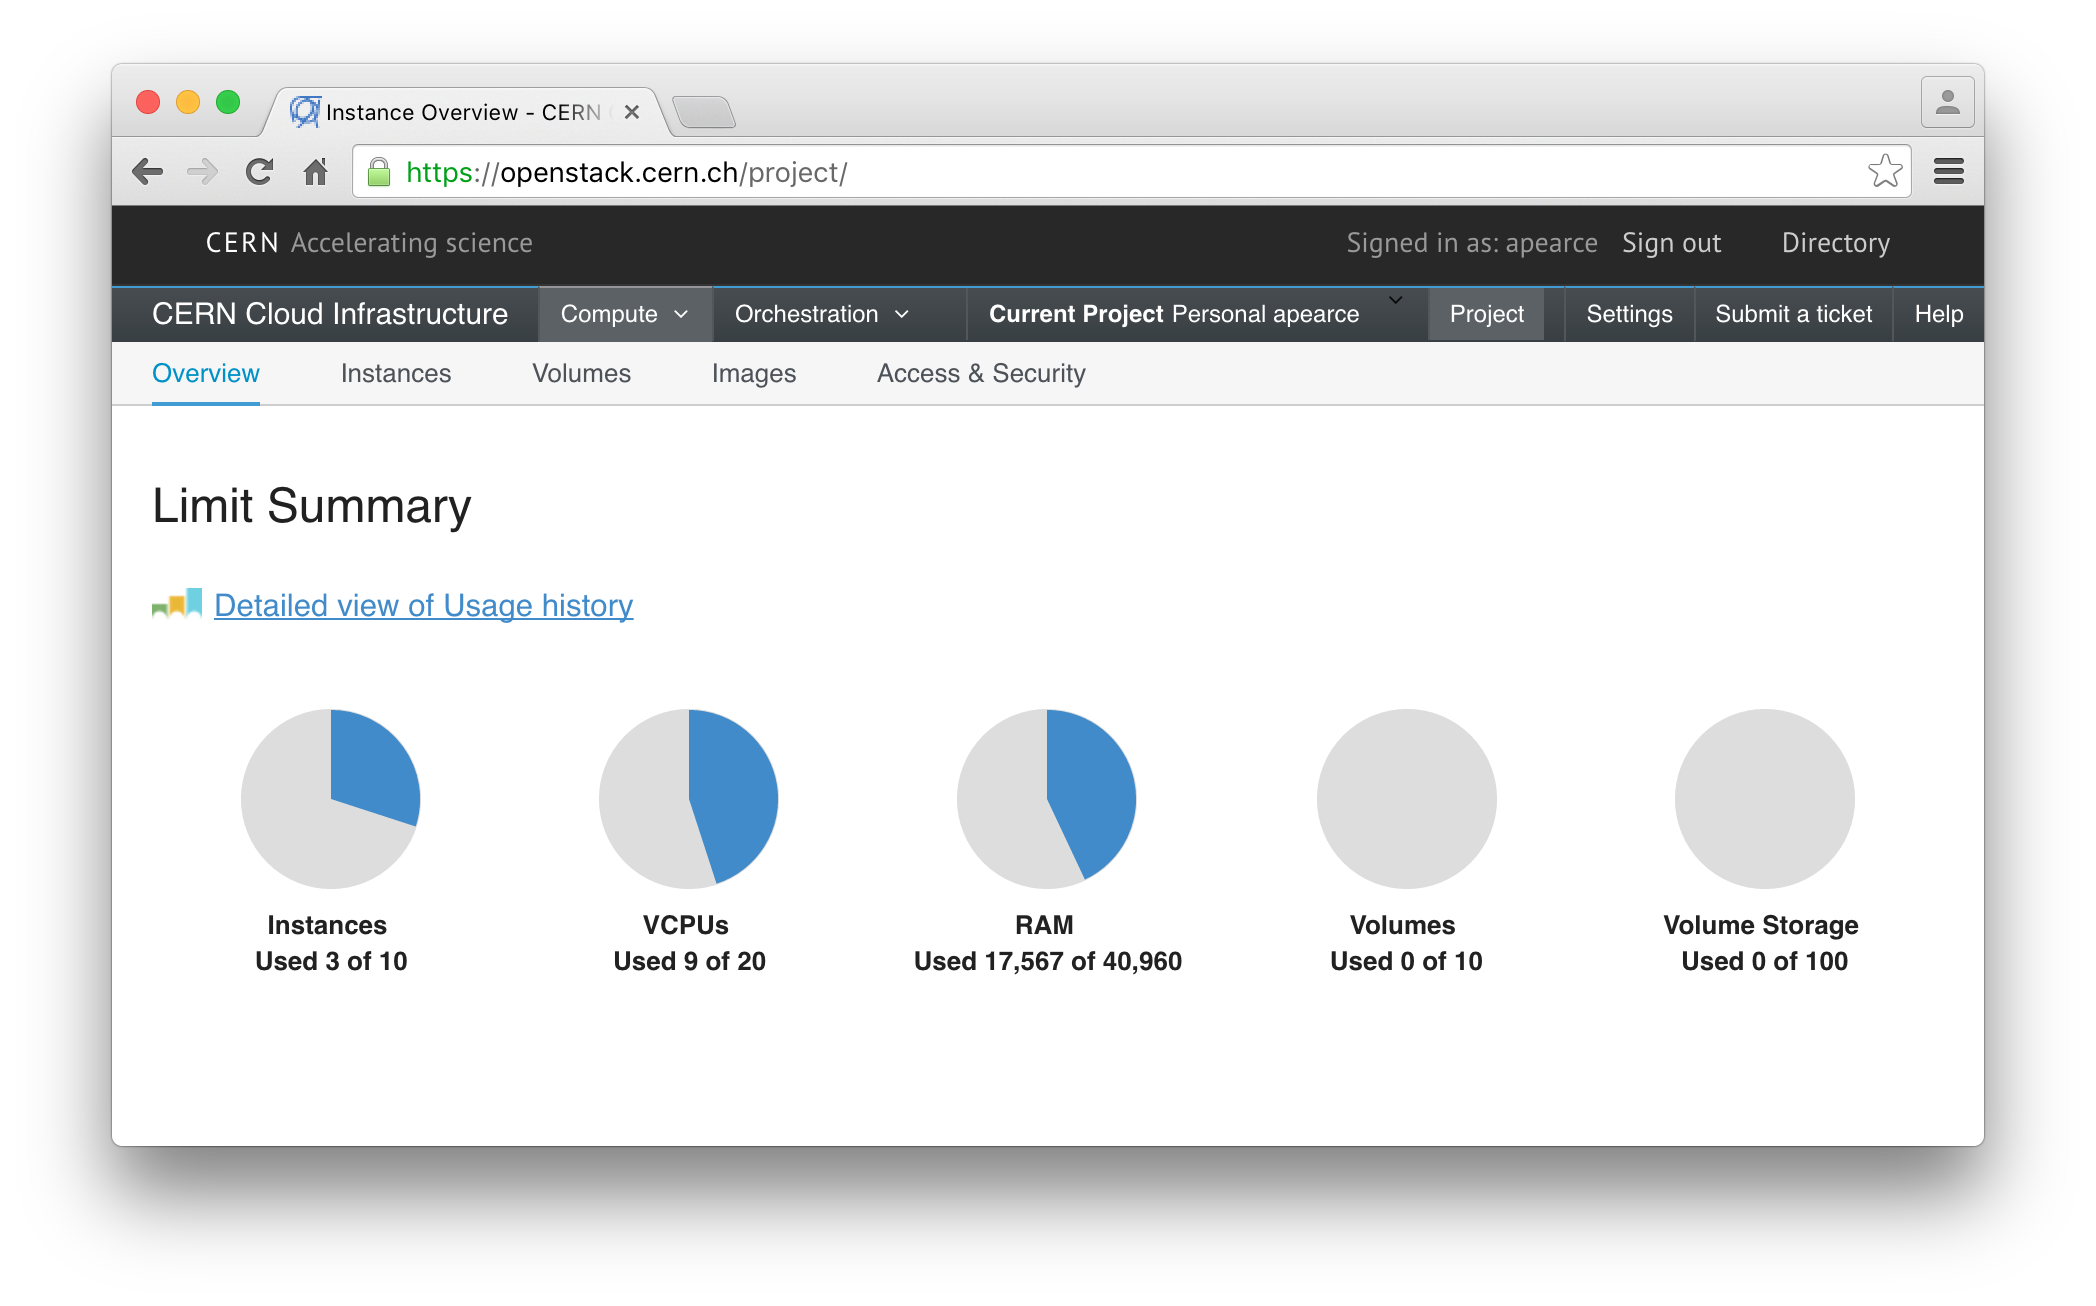
The CERN OpenStack instance allows CERN users to start virtual machines for their own use. After logging in, you’ll be able to see what resources you have available.
Luckily, CERN provide a very nice guide for creating a CERN OpenStack instance, so I won’t go through the details here. The important thing is to first sign up for the CERN OpenStack service, and then to add a keypair. Once that’s done, you’ll want to click on ‘Launch Instance’, from the ‘Instances’ page, and to end up with a screen that looks something like this:
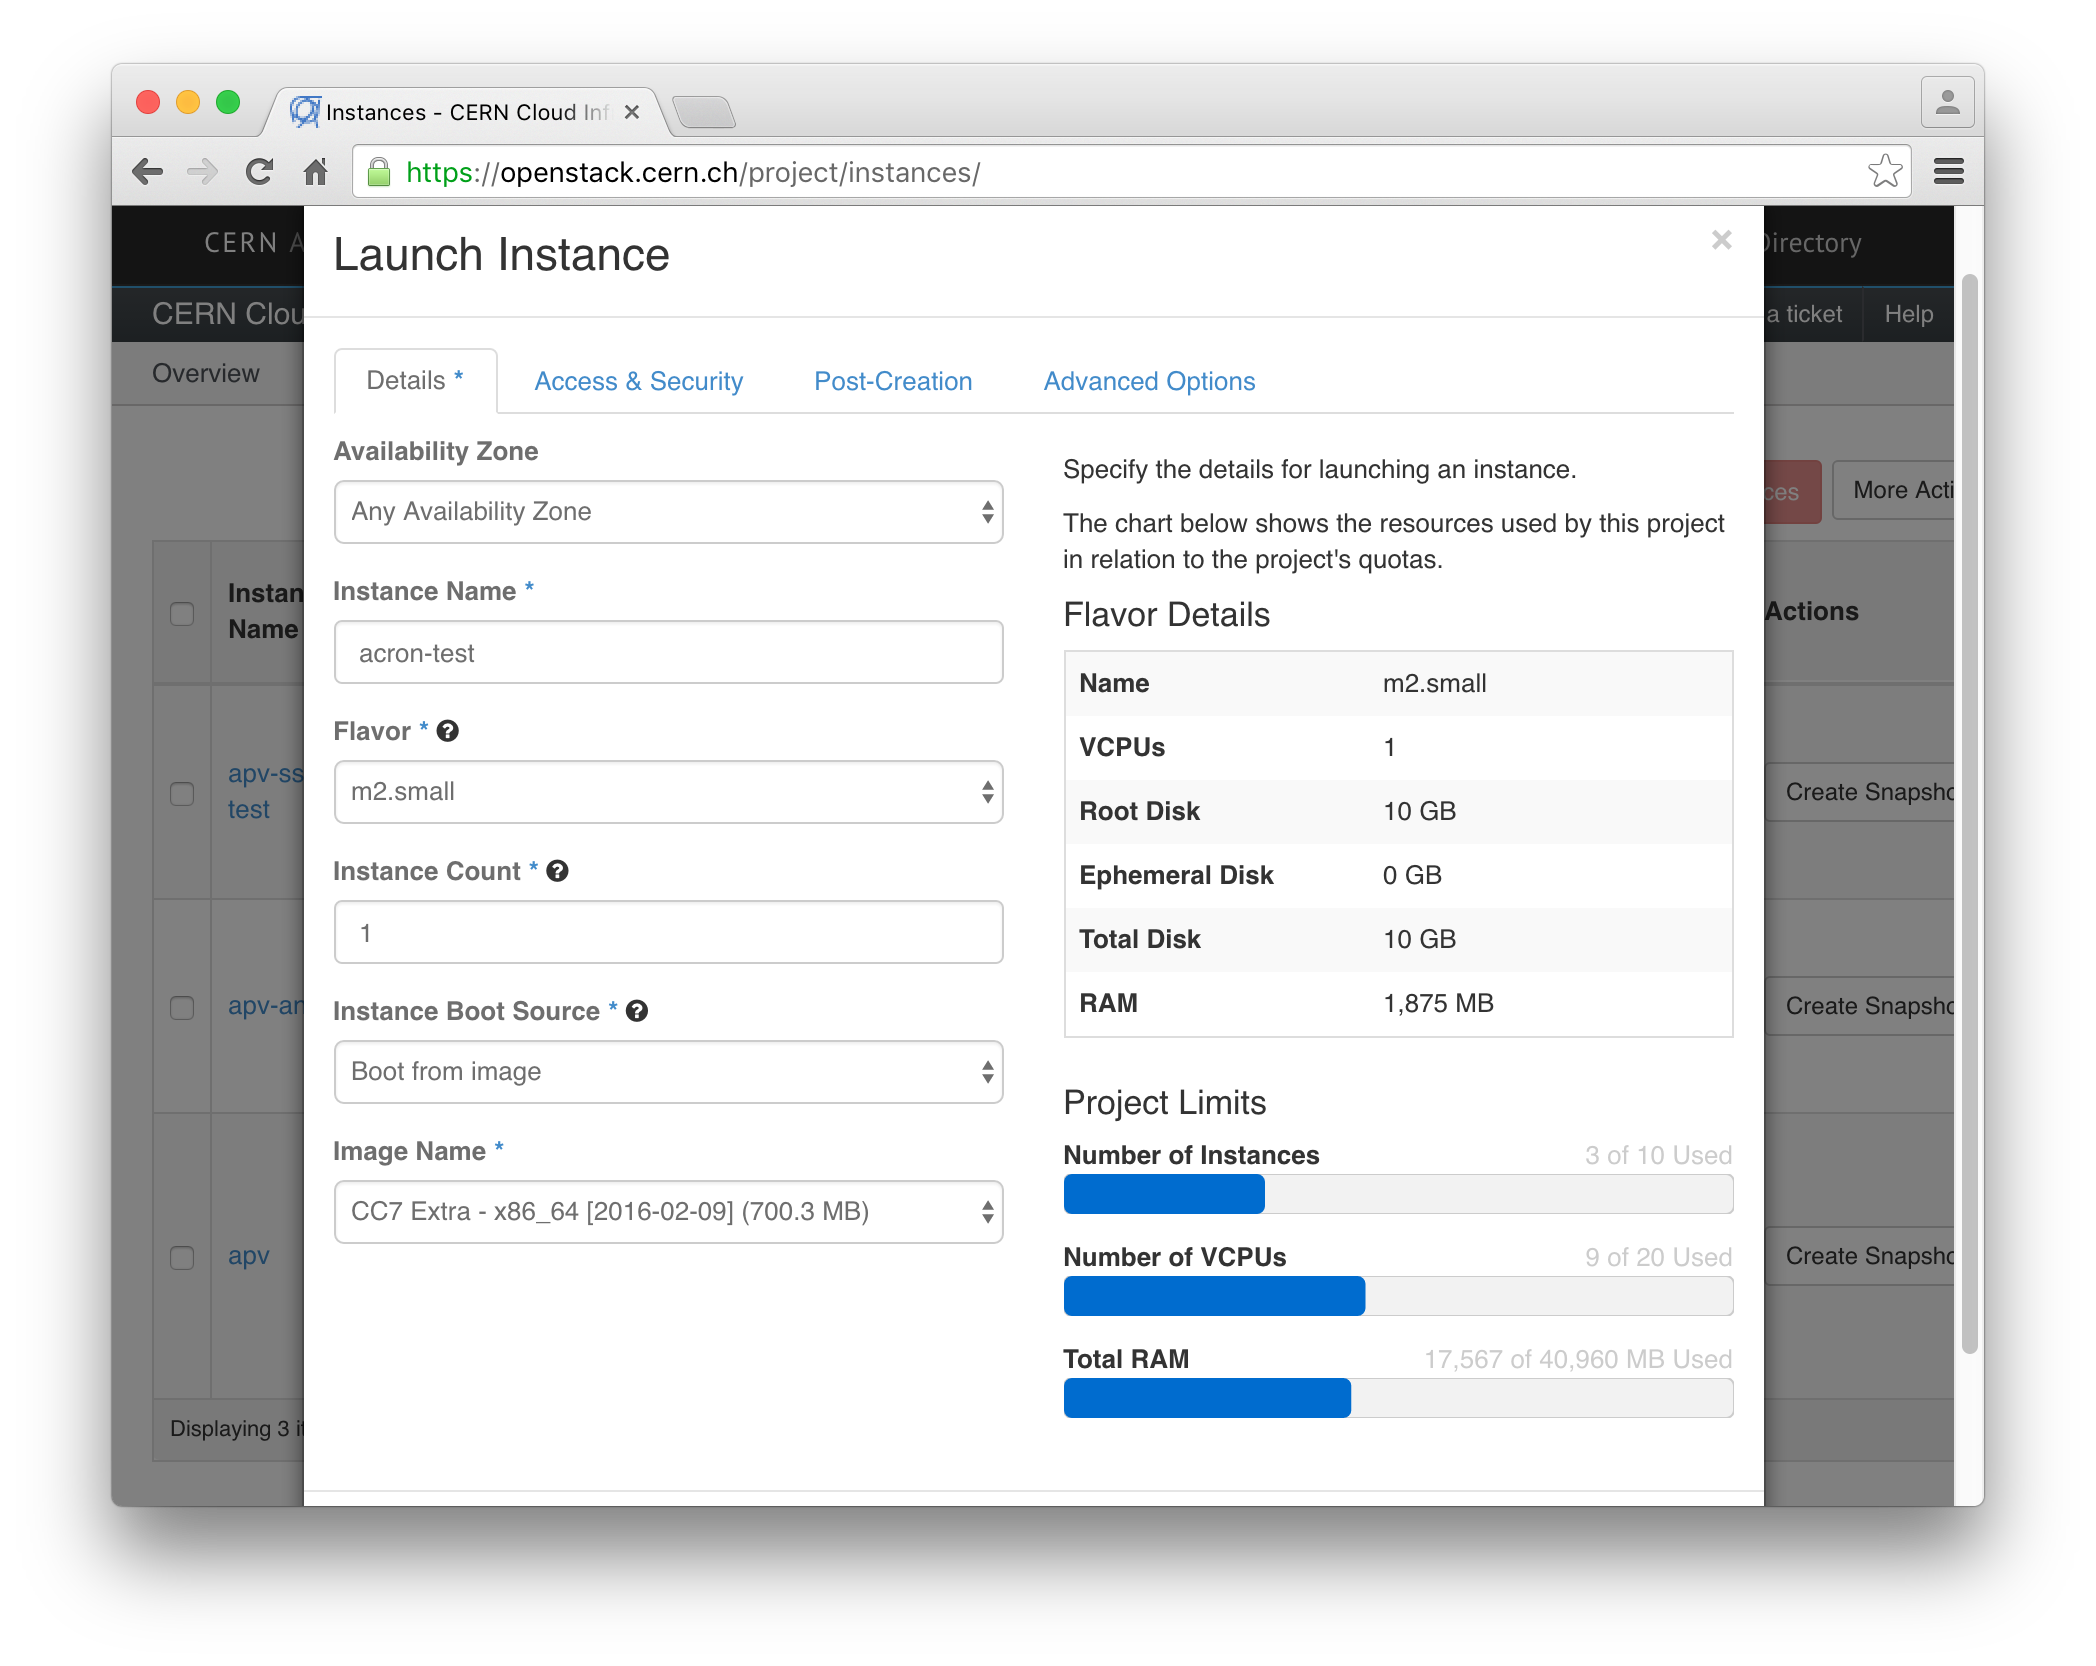
Specifically, make sure to select ‘Boot from image’ and then choose the ‘CC7
Extra’ image that has the latest date (which is 2016-02-09, as of the date of
this post). I’ve called my VM ‘acron-test’, but you should pick a different
name and make to take a note of it: this name is what you’ll use to access your
machine with ssh acron-test.cern.ch.
(The difference between the ‘Base’ and ‘Extra’ images is that the ‘Extra’ image comes with a bunch of CERN-specific packages pre-installed, as well as already coming with software that’s very commonly used at CERN such as AFS. The definitions of the various images can be found in the cernops/openstack-image-tools GitHub repository)
After clicking ‘Launch’, it will take 5–10 minutes for the VM to be created and ready for us to log in.
Logging in
Once the VM status is ‘Active’, you can try logging in. For security reasons,
VMs are only accessible from inside the CERN network unless you request
otherwise, so you’ll need to log in to a machine in the CERN network, such as
lxplus.cern.ch, before logging in to your VM.
# From a machine inside the CERN network
$ ssh centos@acron-test.cern.ch
The default user is centos, so we tell SSH to assume that user.
If you see errors about permissions, you need to make sure your using the same
SSH keypair you set up in OpenStack.
If you get a timeout error, the machine is probably still booting, so just wait
a while and try again.
If everything goes well, you’ll end up with a prompt on the VM.
[centos@acron-test ~]$Before we move on, we’ll just add the CERN user you usually use to the VM, so
that you don’t need to SSH in as centos, and so you can SSH using your usual
authentication method (like passwords or Kerberos tokens).
[centos@acron-test ~]$ sudo yum install -y cern-config-users
[centos@acron-test ~]$ sudo cern-config-users --setup-all
[centos@acron-test ~]$ su - your_username
The first command looks in the CERN LanDB to see who owns the machine (that’s you!), and then sets up the appropriate user account. The second command logs you in as that user on the VM (you’ll need to enter your password). I found that the second step was necessary before I could log in to the VM from another machine.
You can now log off the VM, and try logging in using your regular username.
# On another CERN machine, such as lxplus
$ ssh your_username@acron-test.cern.ch
Now we’re ready to install the software needed for our VM to run acron jobs!
Dependencies and configuration
For this section, make sure you’re logged in to the VM we just made, with the CERN username you normally use. There is a guide for setting up a machine to accept acron jobs by CERN, and we’re going follow that here pretty closely. Take note: from now on, all commands should be run on the VM.
First, we make sure that the machine is correctly configured to retrieve Kerberos tokens, which are used to allow the acron jobs to access user’s files.
# Say 'yes' to accepting sudo responsibility (scary!)
$ sudo yum install -y cern-get-keytab
$ sudo cern-get-keytab --force
Next, install the software that the central acron servers will talk to when an acron job should be run on the VM.
$ sudo yum install -y arc-server(The central acron servers are managed by the CERN IT group.)
We need to open a hole in the VM’s firewall for the acron messages to pass through.
$ sudo firewall-cmd --zone=public --add-port=4241/tcp --permanent
$ sudo firewall-cmd --reload
$ sudo firewall-cmd --list-all
public (default, active)
  interfaces: eth0
  sources:
  services: dhcpv6-client ssh
  ports: 4241/tcp
  masquerade: no
  forward-ports:
  icmp-blocks:
  rich rules:
The last commands shows us that the port 4241 is now open, and it’s this port that the acron communication takes place over.
We then need to disable the dynroot option of AFS (the shared filesystem used
for user home directories and workspaces).
$ sudo sed -i"" "s/ \-dynroot//" /etc/sysconfig/openafsFinally, we need to restart the xinetd service, which is responsible for
handling traffic in to and out of our VM, just after adding the acron
communication port to the list of known ports.
$ echo -e 'arc 4241/tcp\n' | sudo tee -a /etc/services
$ sudo service xinetd restart
Finally, reboot.
$ sudo reboot nowAnd that’s it! Once the machine has restarted, we’re ready to submit acron jobs to our VM.
Using the VM for acron jobs
On lxplus, you can now edit the acron table file as usual, but this time you can specify the address of your VM as the host.
01 01 * * * acron-test.cern.ch date > date.logThis will run the command date > date.log, which saves the date and time the
command was run to the date.log file. Acron jobs start in your AFS home
directory, and so you’ll see the date.log file there once the job has
finished.
Try adding this job to your acrontab file with acrontab -e, setting the time
to a couple of minutes in future, and then wait a few minutes to see if the
file has been created.
Editing the acrontab file on the VM
The acrontab program lives in /afs/usr/local/bin, but if you try to run
that file on your VM, you’ll get an error.
# Executed on the VM
$ /afs/usr/local/bin/acrontab -e
error in arc command, retrying.  Error message:
/afs/usr/local/etc/arc: error while loading shared libraries: libkrb4.so.2: cannot open shared object file: No such file or directory
I don’t know what this means, and I don’t know how to fix it. Seeing as you can still edit the acrontab file on lxplus it doesn’t bother me, but let me know in the comments if you have a solution.
Summary
We’ve created a virtual machine that can be used to run acron jobs. Now, you can install any software you like on the VM, and use that software as part of your acron job. We’ll see in a later post what sorts of cools things you might want to do.
To speed up the creation of your own acron VMsm I’ve prepared a gist for setting up a VM for acron jobs that you can upload to newly created VMs and run. It contains the list of commands in this post. Once the VM has booted and you’ve run the script, you should be able to begin running acron jobs on it right away.