An Ubuntu VPS with rbenv, nginx and Passenger
Published onThis post has been archived. It's pretty old and likely concerns topics that are avoidable by using more modern tools and techniques. The original text is preserved below for posterity but it may no longer be relevant or correct.
Every once in a while I buy a new VPS, mostly because I’m not entirely satisfied with my current setup. My stack of choice is usually RVM for Ruby management, the Apache web server, Passenger for allowing Apache to run Ruby apps like Rails and Sinatra, and MySQL for the database.
This time around I decided to use some other software that seems to be popular with the community.
- For the webserver I chose nginx. There are many comparisons of Apache and nginx, but for such a small-scale server as mine it really boiled down to curiosity.
- RVM has received some flack, principally because of Bundler’s ability to manage “gemsets” with Gemfiles. I went with rbenv to manage my rubies.
- I stuck with Passenger for allowing the web server to run Ruby apps. Although other solutions exist, like Unicorn and Thin, the configuration required was a little too much for me.
- PostgreSQL is a popular choice these days. If it’s good enough for Ryan Bates then it’s good enough for me!
Now that the stack’s chosen, it’s just a case of setting it all up.
Setting Up Ubuntu
In this section all commands are executed as the root user, as when you log in to a fresh install. If you’ve already got a user set up, prefix all the commands in this section with sudo.
I chose Ubuntu as my Linux distribution of choice. The lastest Ubuntu image provided by my VPS host was 11.04, so first I had to update Ubuntu to the latest LTS, 12.04. First, make sure we’re up-to-date.
$ apt-get -y update
$ apt-get -y upgrade
The -y flag assumes a ‘yes’ response for all prompts. Next, as there’s no direct upgrade route from 11.04 to 12.04, we need to go via 11.10.
$ apt-get install update-manager-core
$ do-release-upgrade
Confirm that you want to perform the upgrade, and once that’s finished and the VPS restarted (reboot) Ubuntu will be at 11.10. You can check this:
$ lsb_release -a
...
Release:        11.10
Perform do-release-upgrade again to arrive at 12.04 LTS.
For a basic setting up of our VPS, the Slicehost article on setting up Ubuntu is great. In particular, make sure to set up the wheel admin group and get iptables set up. We’ll add a user to the wheel group later.
Once that’s done, we have a non-root user with which to log in to the VPS. Log in as that user from your local machine.
$ ssh user@12.345.23.91

Welcome to Ubuntu 12.04 LTS (GNU/Linux 2.6.38-8-generic x86_64)
$ ...
Create a user to deploy with and add her to the wheel group.
$ sudo useradd -G wheel deployWhere deploy is the username of our new user. Finally, we’ll install a few dependencies for later.
$ sudo apt-get -y install curl git-core python-software-properties build-essential zlib1g-dev libssl-dev libreadline-gplv2-dev libcurl4-openssl-dev Installing the Components
We have four main components to install: Ruby, PostgreSQL, Passenger, and nginx. We’ll install them in that order, as Passenger comes with a handy command that installs nginx from source for us.
To install Ruby we’ll install rbenv, which allows us to manage multiple rubies on the same machine. As deploy will be deploying the apps, we need her to have access to the rubies. Assume access as deploy:
$ su - deploy
Password:
And install rbenv using the handy rbenv installer:
$ curl https://raw.github.com/fesplugas/rbenv-installer/master/bin/rbenv-installer | bashAdd the snippet the installer gives you to your .bashrc and source the file in the shell.
$ nano .bashrc # or any other editor
...
$ . .bashrc
To make sure we’ve got all the dependencies required for installing Ruby from source, run rbenv bootstrap-ubuntu-12-04. We’ll install the latest version which is, at the time of writing, 1.9.3 patch 194.
$ rbenv install 1.9.3-p194
...
$ rbenv global 1.9.3-p194
The last command makes 1.9.3-p194 the global, default version of Ruby. You can check the Ruby version with ruby -v.
Now we have Ruby, we can install Passenger as a gem and then refresh rbenv.
$ gem install passenger
$ rbenv rehash
Next, we install nginx.
$ sudo passenger-install-nginx-moduleThe installer will figure out if all the dependencies are preset. If they’re not, it’ll give you a snippet with which to install them. Choose option 1 to let Passenger download, configure, and compile nginx. The default installation directory /opt/nginx is fine, but some people prefer the more familiar Apache-like directory /etc/nginx.
Once that’s installed, we’ll get a script for nginx that allows us to use the service command, so we can do stuff like sudo service nginx restart.
$ sudo curl https://raw.github.com/JasonGiedymin/nginx-init-ubuntu/master/nginx | cat >> /etc/init.d/nginx
$ sudo chmod +x /etc/init.d/nginx
$ sudo /usr/sbin/update-rc.d -f nginx defaults
We’ll also replace the default nginx configuration with a leaner one. Download the simple config file and replace the current one (backing up first, of course).
$ curl https://raw.github.com/alexpearce/templates/master/nginx.conf | cat >> nginx.conf
$ sudo mv /opt/nginx/conf/nginx.conf /opt/nginx/conf/nginx.conf.old # back up
$ sudo mv ./nginx.conf /opt/nginx/conf
Notice that this new configuration file includes files from /opt/nginx/sites-available. This is similar to how many people set up Apache with virtual hosts. For each site we want (generally represented as a (sub)domain or set of (sub)domains) we create a file inside sites-enabled.
If you installed nginx to a different directory, such as /etc/nginx, modify the nginx init.d and nginx.conf file to point to the right places. Check everything’s working by restarting nginx.
$ sudo service nginx restart
* Stopping Nginx Server...
...done.
* Starting Nginx Server...
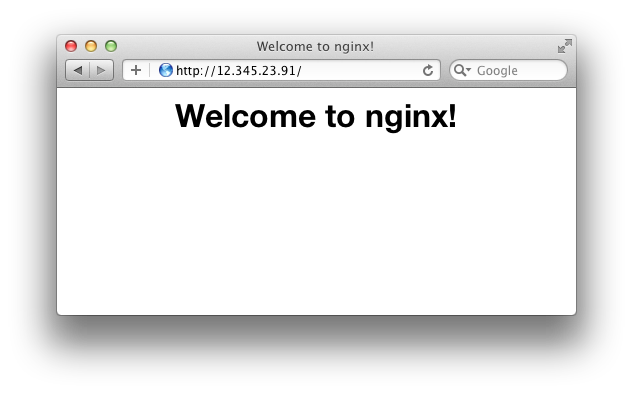
...done.We can double-check nginx is working by visiting our VPS IP.
Great! Now we have all we need to run Ruby apps. With something like Rails we need one one more thing though: a database. The version of PostgreSQL in the Ubuntu repository is a little outdated, so we’ll install it from an up-to-date PPA.
$ sudo add-apt-repository ppa:pitti/postgresql
$ sudo apt-get update
$ sudo install postgresql libpq-dev
libpq-dev is a dependency of the pg gem, which Rails will need to talk to the database. Now that PostgreSQL is installed, we’ll change the root password and set up a test user.
$ pqsql

postgres=# \password
Enter new password:
...
postgres=# create user test with password 'secret';
postgres=# create database test_production owner test;
postgres=# \q

$
Good, that’s everything for now. Let’s try getting a Rails app up and running!
Testing
We’ll get a fresh Rails app going as the deploying user, so make sure you’re logged in as deploy.
$ su - deployWe want each app to have its own set of gems. Using Bundler, we can do this easily with a Gemfile.
$ mkdir testapp
$ cd testapp
$ echo -e ’source :rubygems\n\ngem "rails"' >> Gemfile
We now have a Gemfile which Bundler can work with. We now install the bundler gem, install the stuff in our Gemfile to vendor/bundle (which will act as our app-specific gemset) and create the Rails test app.
$ gem install bundler
$ rbenv rehash
$ bundle install --path vendor/bundle
$ bundle exec rails new . -d postgresql
Choose Y to overwrite our Gemfile with the Rails template. Now, install the rest of the Rails dependencies.
$ bundle install
...
Your bundle is complete! It was installed into ./vendor/bundle
To make sure Rails can talk to the database, edit database.yml with the test PostgreSQL user and database details.
$ nano config/database.yml
...
production:
  adapter: postgresql
  encoding: unicode
  database: test_production
  pool: 5
  host: localhost
  username: test
  password: secret
...
The host: localhost is particularly important (and not in the default Rails database.yml); my app wouldn’t work without it.
Now we just need to tell nginx where our Rails app is. As I mentioned earlier, we’ve set up nginx so that each site has its own config file inside nginx/sites-enabled. I’ve uploaded a test app config file on GitHub. We just download this to this nginx directory and edit it so that it points to the right place.
$ curl https://raw.github.com/alexpearce/templates/master/nginx.server.conf | cat >> testapp
$ nano testapp
... # edit the config file so that it points to our app
$ sudo mv testapp /opt/nginx/sites-enabled/
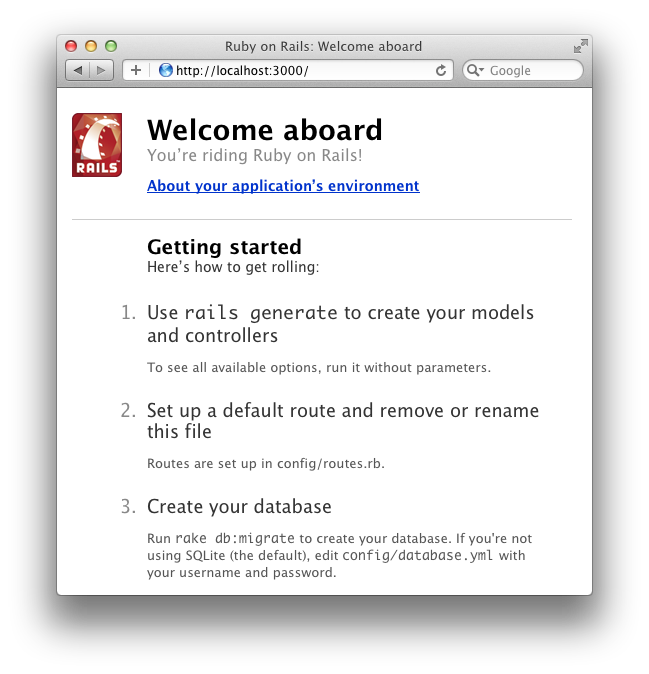
$ sudo service nginx restartVisiting the VPS IP, it works!
Excellent. We’ve set up a VPS from scratch to serve Ruby applications, installing rbenv, Passenger, nginx, and PostgreSQL. If you’d like to test the Rails app a little further, delete index.html in the public directory and scaffold some models. Create, update, and delete a few records to make sure the database is OK.
# Inside the ~deploy/testapp directory
$ rm public/index.html
$ rails g scaffold post title body:text
$ touch tmp/restart.txt # this tells passenger to restart the app
That’s all for now, next we’ll go over deploying from a local machine to the VPS with Capistrano.